Creating Forms
Website မှာ contact us , comments စတာတွေ ပေးတာတွေ လုပ်ချင်သလား ။ အခု အခန်းမှာတော့ form တွေ ဘယ်လို တည်ဆောက်ရမလဲ ၊ ဘယ်လို အသုံးပြုရမလဲ ဆိုတာ ကို ပြောပြပေးသွားမှာပါ။
Understanding Forms
ကျွန်တော်တို့တွေဟာ form ကို information တွေ စုဆောင်းဖို့ အတွက် အသုံးပြုပါတယ်။ ဥပမာ။။ ကျွန်တော်တို့ရဲ့ website ကို လာရောက်သူတွေက ကျွန်တော် တို့ကို ဆက်သွယ်ချင်ရင် ဒါမှမဟုတ် အကြံဉာဏ်တွေ ပေးစေချင်ရင် form မှာ data တွေ ဖြည့်ပြီးတော့ submit လေးကို နှိပ်ပြီး ကျွန်တော် တို့ ဆီ ပေးပို့ နိုင်ပါတယ်။ Data တွေဟာ ကျွန်တော်တို့ front end ပိုင်း HTML ကနေ backend ပိုင်းကို ရောက်သွားပါတယ်။ backend ပိုင်းက data တွေကို collect လုပ်ပြီး database ထဲမှာ ထည့်သိမ်းတာ ဒါမှမဟုတ် email ပို့တာ စသည်ဖြစ် လိုအပ်တာတွေ လုပ်ပါတယ်။
အခု modern HTML စာအုပ်မှာတော့ backend ပိုင်း အလုပ်လုပ်တာ မပါပါဘူး။ အဓိက HTML နဲ့ Form ဘယ်လို တည်ဆောက်ရလဲ ဆိုတာကိုပဲ ရေးသားသွား မှာပါ။
Backend
Backend ပိုင်းကို PHP၊ ASP.NET စတဲ့ server-side language တစ်ခုခု နဲ့ ရေးသားရပါတယ်။ အဲဒီအပိုင်းဟာ Programming language နဲ့ သက်ဆိုင်ပါတယ်။ HTML, CSS, JavaScript ကို သဘောပေါက်ပြီး server side ပိုင်းတွေ ရေးမယ်ဆိုရင်တော့ Server Side language တစ်ခုခု ကို ရွေးချယ်ပြီး လေ့လာဖို့ လိုပါတယ်။ Data တွေကို သိမ်းဖို့ အတွက် MySQL , Microsoft SQL Server စတဲ့ database server တွေ မှာ သိမ်းဆည်းထားပါတယ်။ ဒီအပိုင်းတွေဟာ server side language တွေကို လေ့လာတဲ့ အခါမှာ သိလာပါလိမ့်မယ်။
ဒီ စာအုပ်မှာတော့ အခြေခံဖြစ်တဲ့ HTML ကို သာ အဓိကထားပြီးရေးသွားမှာ ဖြစ်တဲ့ အတွက်ကြောင့် Form ဟာ UI Design ပုံစံသာ ဖြစ်နေပါလိမ့်မယ်။ လက်တွေ့ အလုပ်ဖြစ်ဖို့ အတွက် အထက်က ပြောခဲ့သလို Server Side နဲ့ ပေါင်းပြီး ရေးသား ဖို့လိုပါတယ်။ Server Side နဲ့ HTML form ပေါင်းမှသာ comment system , Feedback Form , File upload စတာတွေဟာ အသက်ဝင်လာပါလိမ့်မယ်။
Types of Form Elements
Forms ဖန်တီးတော့မယ်ဆိုရင် form ထဲမှာ ဘယ် လို data တွေ ထည့်လို့ရလဲ ဆိုတာ သိဖို့လိုပါတယ်။ Form ထဲမှာ text box တွေပဲ ဖြစ်နိုင်သလို radio buttons , checkbox စတာတွေပါတာလည်း ဖြစ်နိုင်ပါတယ်။ Form တစ်ခုမှာ ပုံမှန် အားဖြင့် submit button ပါပါတယ်။ submit button ကတော့ form က data တွေကို web server ဆီ ပို့ပေးတဲ့ အပိုင်း ဖြစ်ပါတယ်။
Text Boxes
Textbox ကတော့ user တွေ data ရိုက်ထည့် ဖို့ အတွက် အသုံးပြုပါတယ်။ textbox data တွေဟာ limited character တွေ ဖြစ်နိုင်သလို phone number , postal code စတာတွေ လည်း ဖြစ်နိုင်ပါတယ်။ Modern HTML မှာ text content တွေကို email address သို့မဟုတ် URL အဖြစ် သတ်မှတ်လို့ရပါတယ်။
Radio Buttons
Radio button တွေ အဝိုင်းလေးတွေ ကို form တွေမှာ မြင်ဖူးပါလိမ့်မယ်။ ရွေးချယ်စရာတွေ အများကြီးထဲမှာ တစ်ခုကို ရွေးချယ်စေလိုရင် radio button ကို အသုံးပြုပါတယ်။
Check Boxes
Chek boxes က ရွေးချယ်စရာတွေ တစ်ခု ထက် မက ပေးထားတဲ့ အထဲမှာ တစ်ခု သို့မဟုတ် တစ်ခု ထက်ပို ရွေးချယ်ဖို့ အတွက် အသုံးပြုပါတယ်။
Menu
Menu ကတော့ တစ်ခုခု ကို ရွေးချယ်ဖို့ အတွက်ပဲ အသုံးပြုတာပါ။ Drop down menu နဲ့ ဖြစ်ပြီး နှိပ်လိုက်တဲ့ အခါမှသာ list ကျလာပြီး တစ်ခုကို ရွေးချယ်နိုင်ပါတယ်။
File Upload
File တွေ image တွေ upload လုပ်ဖို့ အတွက် File type ကို အသုံးပြုရပါတယ်။ File ကို အသုံးပြုထားရင် browser မှာ file ရွေးဖို့ ပေါ်လာပါတယ်။
Range Slider
Modern HTML မှာ range slider ပါလာပါတယ်။ Range Slider ကတော့ ပေးထားတဲ့ ကြားထဲက value ကို ရွေးချယ်ဖို့ အတွက် အသုံးပြု့ပါတယ်။
Date and Time Fields
Modern HTML မှာ နေ့စွဲတွေ အချိန်တွေကို အသုံးပြုဖို့အတွက် date/time input type တွေ ပါလာပါတယ်။ Browser အများစုမှာ date picker သို့မဟုတ် time picker UI ကို ပြပေးနိုင်ပြီး browser ပေါ်မူတည်ပြီး UI ပုံစံ ကွာနိုင်ပါတယ်။
Submit Button
Submit Button က နှိပ်လိုက်တဲ့ အခါမှာ form က data တွေကို စုဆောင်းပြီးတော့ web server ဆီ ပို့ပေးပါတယ်။
Reset Button
Form မှာ data တွေ ထည့်ထားပြီးတော့ အကုန်လုံးကို ပြန်ရှင်းလိုရင်တော့ reset Button လေးကို နှိပ်လိုက်ရင်ရပါတယ်။ ပုံမှန် အားဖြင့် Submit Button ဘေးမှာ ထားြ့ပီး အသုံးပြုတတ်ကြပါတယ်။
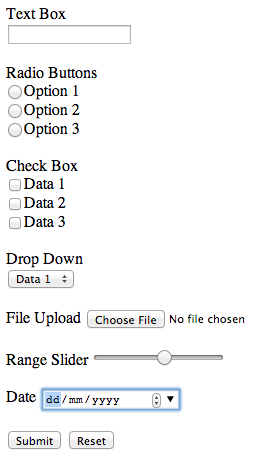
Figure 8-1
Create a Form
Form တစ်ခု ဖန်တီးဖို့ အတွက် <form> tag နဲ့ အသုံးပြုပါတယ်။ action attribute ကတော့ data တွေကို ပို့ပေးဖို့ server address ဖြစ်ပါတယ်။
<!DOCTYPE html>
<html>
<head>
    <meta charset="UTF-8">
    <title>Simple Form</title>
</head>
<body>
    <form method="post" action="./post.php">
    </form>
</html>
အထက်ပါ code မှာ form ရဲ့ method က post သုံးမယ်လို့ ဆိုထား့ပါတယ်။ action ကတော့ post.php ကို form က data တွေ ပို့မယ်လို့ ဆိုထားတာပါ။
Form မှာ method ၂ မျိုးရှိပါတယ်။ post method နဲ့ get method ပါ။ POST က data တွေကို submit လုပ်တဲ့ အခါမှာ အသုံးပြုပြီးတော့ GET method ကတော့ data တွေကို ရှာဖွေ တဲ့ အခါမှာ အသုံးပြုပါတယ်။
GET method နဲ့ပို့လိုက်ရင်
server.php?name=value1&name2=valu2
ဆိုပြီး query string နဲ့ data တွေကို ပို့ပါတယ်။
POST method ဆိုရင်တော့ HTTP message body ကတော့ data တွေကို ပို့ပါတယ်။
POST server.php
Host : example.com
name=value1&name2=valu2
Send Form Data to an E-Mail Address
တကယ်လို့ form data ကို backend server ကို မပို့ချင်ပဲ အသုံးပြုသူကို သူ့ရဲ့ email အနေနဲ့ ပို့စေချင်ရင်တော့ action မှာ ပြောင်းပေးဖို့လိုပါတယ်။ data တွေကတော့ form မှာ ရှိတဲ့ data name နဲ့ value တွဲပြီး ဖော်ပြပါလိမ့်မယ်။ ဥပမာ။။ month=June။
<!DOCTYPE html>
<html>
<head>
    <meta charset="UTF-8">
    <title>Simple Form</title>
</head>
<body>
    <form method="post" enctype="text/plain" action="mailto:saturngod@example.com">

        <input type="text" name="message"/>
        <input type="submit">
    </form>
</html>
အဲဒီမှာ action ကို mailto:saturngod@example.com ဆိုပြီး ရေးထားတာတွေ့ နိုင်ပါတယ်။ email ကို ပို့စေချင်ရင်တော့ mailto: ကို အရှေ့မှာ ထားပြီး နောက်မှာ ကိုယ့်ရဲ့ email ကို ထည့်ရပါတယ်။ enctype="text/plain" ကိုလည်း ထည့်ဖို့လိုပါတယ်။
ဒီနည်းလမ်းက user ရဲ့ device ထဲမှာ email app ပြင်ဆင်ထားမှ အလုပ်လုပ်နိုင်ပါတယ်။ Contact form ကို production website မှာ သုံးမယ်ဆိုရင် backend server သို့မဟုတ် form handling service ကို submit လုပ်တာ ပိုယုံကြည်စိတ်ချရပါတယ်။
အဲဒီ code လေးက browser မှာ ဆိုရင် ဒီလိုပေါ်လာပါမယ်။
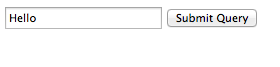
Figure 8-2.
စာထည့်ပြီးတော့ submit ကို နှိပ်လိုက်ရင် email form လေး တက်လာပါမယ်။
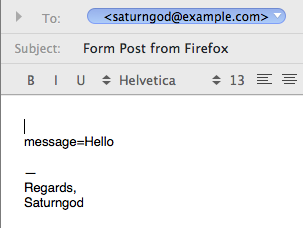
Figure 8-3.
အဆင်သင့် email ပို့လိုက်ရုံပါပဲ။
Add a Text Box
Text box ဟာ အသုံးပြုသူကို စာတစ်ကြောင်းထဲရှိတဲ့ data တွေ ထည့်သွင်းစေချင်တဲ့ အခါမှာ အသုံးပြုပါတယ်။ ကျွန်တော်တို့ အနေနဲ့ text box ရဲ့ size နောက်ပြီး အများဆုံး စာလုံး အရေအတွက် တွေကို ထိန်းချုပ်လို့ရပါတယ်။ ပုံမှန် အားဖြင့် textbox က စာလုံးရေ ၂၀ သာရှိတဲ့ အရွယ်သာ ရှိပါတယ်။
<!DOCTYPE html>
<html>
<head>
    <meta charset="UTF-8">
    <title>Simple Form</title>
</head>
<body>
    <form method="post" action="./post.php">
        Enter your name :
        <input type="text" name="name" size=40 maxlength=50/>
    </form>
</html>
ဒီ code လေးမှာ input type ရဲ့ နာမည်ကို name လို့ ပေးထားပြီးတော့ size ကတော့ text box ရဲ့ အကျယ်ပါ။ 40 ဆိုတာကတော့ စာလုံးအရေအတွက် ၄၀ စာ ကျယ်တဲ့ text box လို့ ဆိုလိုတာပါ။ maxlength ကတော့ စုစုပေါင်း လက်ခံမယ့် စာလုံးအရေအတွက်ပါ။ အခု code မှာတော့ အများဆုံး အလုံး ၅၀ ပဲ ရိုက်ထည့်ခွင့်ပေးထားပါတယ်။

Figure 8-4.
တကယ်လို့ text မထည့်ချင်ပဲ password ထည့်ချင်ရင်တော့ type နေရာမှာ password ထည့်ပေးဖို့လိုပါတယ်။ text နဲ့ password ကွာခြားချက်ကတော့ password ဟာ ရိုက်ထည့်ထားတဲ့ စာလုံးကို မမြင်ရပါဘူး။
<input type="password" name="password"/>

Figure 8-5.
Add a Large Text Area
အကယ်၍ စာတစ်ကြောင်းတည်းမက data တွေကို ထည့်သွင်းစေလိုတယ်ဆိုရင်တော့ text box အစား textarea ကို အသုံးပြုဖို့လိုပါလိမ့်မယ်။
<!DOCTYPE html>
<html>
<head>
    <meta charset="UTF-8">
    <title>Simple Form</title>
</head>
<body>
    <form method="post" action="./post.php">
        Enter your comment :
        <br/>
        <textarea name="comment" rows="5" cols="60" wrap="hard">Add your comment here</textarea>
    </form>
</html>
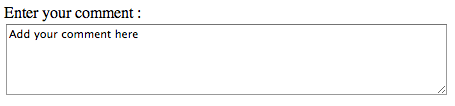
Figure 8-6. Text Area
အဲဒီ code မှာ rows ကတော့ textarea ထဲမှာ စာ ဘယ်နှစ်ကြောင်းပြမလဲ နောက်ပြီး cols ကတော့ textarea အကျယ်ကို စာလုံး အရေအတွက် ဘယ်လောက်ဖော်ပြမလဲကို ဆိုလိုပါတယ်။ wrap ကတော့ ၃ မျိုးရှိပါတယ်။
soft wrap ကတော့ text area ထဲမှာ စာကြောင်း ဖြတ်ပေးပေမယ့် data ကို server ဆီကို ပို့တဲ့ အခါမှာ မဖြတ်ပါဘူး။
hard wrap ကတော့ textarea ကော form data ၂ ခုလုံးမှာ ဖြတ်ပါတယ်။
off ကတော့ စာကြောင်း မဖြတ်ပေးတော့ပါဘူး။ line break ကို သုံးစွဲသူ ကိုယ်တိုင် enter ခေါက်မှသာ line break လုပ်ပေးပါလိမ့်မယ်။
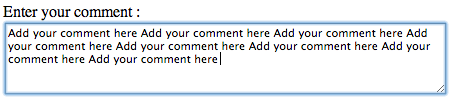
Figure 8-7. Hard Wrap
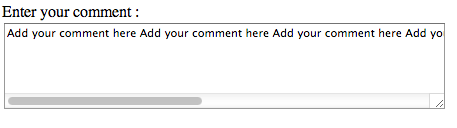
Figure 8-8. Off Wrap
တကယ်လို့ အသုံးပြုသူကို စာရိုက်ထည့်ခွင့် မပေးချင်ရင်တော့ readonly attribute ကို အသုံးပြုနိုင်ပါတယ်။
<textarea cols="20" rows="5" wrap="hard" readonly="yes">
ပုံမှန် textarea ပါပဲ။ သို့ပေမယ့် စာရိုက်ထည့်လို့ မရပါဘူး။
Add Check Boxes
Data တွေကို တစ်ခု ထက်မက ရွေးချယ်ဖို့အတွက် ကျွန်တော်တို့တွေ checkbox ကို အသုံးပြုပါတယ်။ checkbox ကို အသုံးပြုဖို့ input ရဲ့ type ကို checkbox လို့ ပြောင်းလိုက်ရင်ရပါပြီ။
<!DOCTYPE html>
<html>
<head>
    <meta charset="UTF-8">
    <title>Simple Form</title>
</head>
<body>
    <form method="post" action="./post.php">
        Service:

    <input type="checkbox" name="flight" value="yes"> Flight
    <input type="checkbox" name="hotel" value="yes"> Hotel
    <input type="checkbox" name="flight" value="yes"> Car
    </form>
</html>
checkbox မှာ name နဲ့ value attribute ကို ထည့်ပေးရပါတယ်။ Form submit လုပ်တဲ့ အခါ checkbox ရဲ့ data ဟာ value ထဲမှာ ထည့်ထားတဲ့ data ကို submit လုပ်ပေးပါလိမ့်မယ်။ Checkbox အတွက်စာကို သီးသန့် ရေးပေးရပါတယ်။
အထက်ပါ code ကို run ရင် အောက်ကလို မြင်ရပါမယ်။

Figure 8-9
တကယ်လို့ page တက်လာကတည်းက checkbox ကို check လုပ်ထားစေချင်ရင်တော့ checked attribute လေး ထည့်ပေးဖို့လိုပါတယ်။
<input type="checkbox" name="flight" value="yes" checked>

Figure 8-10
Add Radio Buttons
Group ထဲမှာ တစ်ခုကိုပဲ ရွေးချယ်စေချင်ရင်တော့ radio button ကို အသုံးပြုနိုင်ပါတယ်။ ဥပမာ။ Yes , No အဖြေလိုမျိုးပေါ့။
<!DOCTYPE html>
<html>
<head>
    <meta charset="UTF-8">
    <title>Simple Form</title>
</head>
<body>
    <form method="post" action="./post.php">
        Returning customer :

    <input type="radio" name="returning" value="yes">Yes
    <input type="radio" name="returning" value="no">No


    </form>
</html>
radio အတွက် group ဖြစ်အောင် name ကို အတူတူဖြစ်အောင် ပေးထားဖို့လိုပါတယ်။ select လုပ်လိုက်တဲ့ value ကို backend server ဆီကို ပို့ပေးပါလိမ့်မယ်။

Figure 8-10
တကယ်လို့ page တက်လာကတည်းက radio button တစ်ခုကို check လုပ်ထားစေချင်ရင်တော့ checked attribute လေး ထည့်ပေးဖို့လိုပါတယ်။
<input type="radio" name="returning" value="yes" checked>
Add a Menu List
Value တစ်ခုကို ရွေးချယ်စေချင်ရင် menu list ကို ကျွန်တော်တို့တွေ အသုံးပြုပါတယ်။ Option နဲ့ မတူတာကတော့ option ဟာ ရွေးချယ်ရမယ့် value တွေကို အကုန်ကို ဖော်ပြထားပြီးတေ့ menu list ကတော့ မဖော်ပြထားပါဘူး။ Drop down arrow လေးကို နှိပ်လိုက်မှသာ ဖော်ပြပါလိမ့်မယ်။ <select> tag ကို အသုံးပြုပြီးတော့ ရွေးချယ်စေချင်တဲ့ data တွေကိုတော့ <option> tag နဲ့ ထည့်သွင်းပါတယ်။
<!DOCTYPE html>
<html>
<head>
    <meta charset="UTF-8">
    <title>Simple Form</title>
</head>
<body>
    <form method="post" action="./post.php">
        Continent:
    <select name="continent">
      <option value="africa">Africa</option>
      <option value="antarctica">Antarctica</option>
      <option value="asia">Asia</option>
      <option value="australia">Australia</option>
      <option value="eruope">Eruope</option>
      <option value="northamerica">North America</option>
            <option value="southamerica">South America</option>
    </select>


    </form>
</html>
ဆိုတဲ့ code လေးမှာ select tag ကို အသုံးပြုထားပါတယ်။ option ရဲ့ value ဟာ data ကို server ဆီပို့တဲ့ အခါမှာ ရောက်သွားမယ့် တန်ဖိုးပါ။ ဥပမာ။။ South America ကို ရွေးချယ်ထားရင် server ဆီ data ရောက်သွားတဲ့ အခါမှာ continent=southamerica နဲ့ ရောက်သွားပါလိမ့်မယ်။

Figure 8-11
တကယ်လို့ တစ်ခု ထက်မက ရွေးချယ်ဖို့ ဖော်ပြစေလိုရင်တော့ size attribute ကို အသုံးပြုနိုင်ပါတယ်။
<select name="continent" size=5>
size=5 ဆိုတာကတော့ ၅ ခု စာဖော်ပြမယ်လို့ ဆိုလိုတာပါ။ ကျန်တဲ့ စာတွေကိုတော့ scroll ဆွဲဖို့လိုပါတယ်။
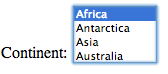
Figure 8-12
တကယ်လို့ value တစ်ခုထက် မက ကို select လုပ်ခွင့်ပေးချင်ရင်တော့ multiple attribute ကို သုံးဖို့လိုပါတယ်။ select ကိုောတ့ windows မှာ ဆိုရင်တော့ Ctrl ကို ဖိကာ click လုပ်ဖို့ လိုအပ်ပါတယ်။ mac မှာဆိုရင်တော့ command ကို ဖိပြီး click လုပ်ဖို့ လိုအပ်ပါတယ်။
<select name="continent" multiple>
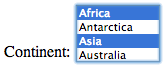
Figure 8-13
Add a Date and Time Input
ကျွန်တော်တို့တွေ date တွေကို ရွေးချယ်ခွင့်ပေးစေချင်ရင် modern HTML မှာ date input type ကို အသုံးပြုနိုင်ပါတယ်။
<!DOCTYPE html>
<html>
<head>
    <meta charset="UTF-8">
    <title>Simple Form</title>
</head>
<body>
    <form method="post" action="./post.php">
    Date : <input type="date" step="1">
    <br/>
        Month : <input type="month" name="lastMonth" min="2000-01" max="2014-06" step="1">
    <br/>
    Week : <input type="week" name="lastweek" step="2">
    <br/>
    Time : <input type="time" name="time" step="1">
    </form>
</html>
Date နဲ့ Time အတွက် input type တွေဟာ
- date
- month
- week
- time
စတဲ့ input type တွေကို အသုံးပြုနိုင်ပါတယ်။ max နဲ့ min ကတော့ အနည်းဆုံး date နဲ့ အများဆုံး ထည့်လို့ ရတဲ့ input ဖြစ်ပါတယ်။ up , down arrow နှိပ်ပြီး value ကို ပြောင်းနိုင်ပါတယ်။ အခု code မှာ အတိုးအလျော့ကို 1 ပဲ ထည့်ထားပါတယ်။ တကယ်လို့ ၁ မဟုတ်စေချင်ရင်တော့ step attribute ကို ပြင်နိုင်ပါတယ်။
Date နဲ့ time ကို field တစ်ခုတည်းမှာ တွဲထည့်ချင်ရင်တော့ datetime-local ကို အသုံးပြုနိုင်ပါတယ်။ Time zone ပါဝင်တဲ့ old datetime input type ကိုတော့ modern HTML မှာ မသုံးတော့ပါဘူး။
<input type="datetime-local" name="meetingTime">
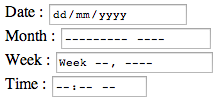
Figure 8-14
တကယ်လို့ နံပတ်တွေပဲ လက်ခံစေချင်ရင်တော့ number value ကို အသုံးပြုနိုင်ပါတယ်။
<input type="number" name="age" value="21" min="1" max="120" step="0.5">
submit လုပ်တဲ့ အခါမှာ data တွေထည့်လိုက်စေချင်တယ်။ သို့ပေမယ့် user က မပြစေချင်ဘူး ုဆိုရင်တော့ hidden type ကို အသုံးပြုနိုင်ပါတယ်။
<input type="hidden" name="special" value="123">
Add an E-Mail Field
ကျွန်တော်တို့တွေ input data ထည့်သွင်းတဲ့ အခါမှာ email ကိုသာ လက်ခံစေလို ရင် email type ကို အသုံးပြုလို့ရပါတယ်။ ပုံမှန် text field နဲ့ အတူတူပါပဲ။ type မှာ email ပြောင်းဖို့သာ လိုပါတယ်။
<!DOCTYPE html>
<html>
<head>
    <meta charset="UTF-8">
    <title>Simple Form</title>
</head>
<body>
    <form method="post" action="./post.php">
   Email :
   <input type="email" name="email" size="20" maxlength=255>
   <input type="submit">
    </form>
</html>
အခု code မှာ email type ကို
<input type="email" name="email" size="20" maxlength=255>
ဆိုပြီး ထည့်သွင်းထားပါတယ်။ text box က attribute လိုပါပဲ။ character အရေအတွက် အလုံး ၂၀ ဖော်ပြမယ်။ အများဆုံး စာလုံး အရေအတွက် ၂၅၅ လုံးပဲ လက်ခံမယ်။ iPhone , Android စတဲ့ mobile phone က အသုံးပြုရင်တော့ keyboard ကို email keyboard နဲ့ ပြပေးပါလိမ့်မယ်။
အဲဒီ code က browser မှာ ဆိုရင် အောက်ကလို ပေါ်နေပါလိမ့်မယ်။

Figure 8-15
တကယ်လို့ email format အမှန် မဟုတ်ပဲ submit လုပ်လိုက်ရင် error ပြနေပါလိမ့်မယ်။
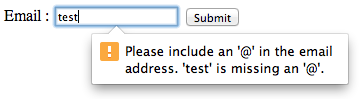
Figure 8-16. Email validation
တကယ်လို့ telephone ကို လက်ခံချင်ရင်တော့ tel type ကို အသုံးပြုရပါလိမ့်မယ်။
<input type="tel" name="telephone">
tel က modern HTML မှာ ပါတဲ့ input type ပါ။ သို့ပေမယ့် browser မှာတော့ validation မရှိပါဘူး။ iPhone , Android စတဲ့ mobile phone က အသုံးပြုရင်တော့ keyboard ကို telephone keyboard နဲ့ ပြပေးပါလိမ့်မယ်။
Add a URL Field
ကျွန်တော်တို့တွေ form မှာ URL ကို လက်ခံလိုရင်တော့ url type ကို အသုံးပြုရပါတယ်။ url type ဟာ modern HTML မှာ ပါတဲ့ feature ဖြစ်ပြီးတော့ form ကို submit လုပ်တဲ့ အခါမှာလည်း validation လုပ်ပေးပါတယ်။
<!DOCTYPE html>
<html>
<head>
    <meta charset="UTF-8">
    <title>Simple Form</title>
</head>
<body>
    <form method="post" action="./post.php">
   Website :
   <input type="url" name="website" size="20" maxlength=255>

   <input type="submit">
    </form>

</html>
URL အတွက်က email လိုပါပဲ။ type မှာ url ပြောင်းထားလိုက်ပါတယ်။

Figure 8-17
Form submit လုပ်တဲ့ အခါမှာ URL မဟုတ်တဲ့ အခါမှာ error ပြပေးပါလိမ့်မယ်။
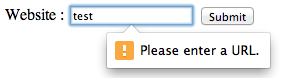
Figure 8-18
Add a Range Slider
Value တွေကို တစ်ခု နဲ့ တစ်ခုကြားက ရွေးချယ်ပေးစေလိုရင်တော့ ကျွန်တော်တို့တွေကို Range ကို အသုံးပြုနိုင်ပါတယ်။
<!DOCTYPE html>
<html>
<head>
    <meta charset="UTF-8">
    <title>Simple Form</title>
</head>
<body>
    <form method="post" action="./post.php">
   Budget :
   <input type="range" name="budget" min="100" max="5000" value="1000" step="100">
    </form>
</html>
အထက်ပါ code မှာ
<input type="range" name="budget" min="100" max="5000" value="1000" step="100">
ကို အသုံးပြုထားပြီးတော့ range လေး ထည့်ထားပါတယ်။ min ကတော့ အနည်းဆုံး တန်ဖိုးနဲ့ max ကတော့ အများဆုံး တန်ဖိုးပေါ့။ အခု ဥပမာ မှာ ၁၀၀ ကနေ ၅၀၀၀ အတွင်း ရွေးခွင့်ပေးထားတယ်။ step="100" ဆိုတဲ့ သဘောကကတော့ value ပြောင်းလဲရင် 100 အတိုးအလျော့လုပ်မယ်။ Browser မှာ ဆိုရင် အောက်ကလိုမျိုး မြင်ရပါမယ်။
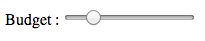
Figure 8-19
သို့ပေမယ့် range value ပြောင်းသွားရင် ကျွန်တော်တို့တွေ မသိပါဘူး။ ဒါကြောင့် ကျွန်တော်တို့တွေ JavaScript ကို သုံးပြီးတော့ value ပြောင်းသွားတာကို ဖော်ပြပေးပါမယ်။ ဒီအခန်းမှာတော့ JavaScript အကြောင်း အသေးစိတ်မပြောတော့ပါဘူး။ JavaScript အခန်းမှာလည်း event တွေ အကြောင်းပါဝင်လာပါလိမ့်မယ်။
<!DOCTYPE html>
<html>
<head>
    <meta charset="UTF-8">
    <title>Simple Form</title>
</head>
<body>
    <form method="post" action="./post.php">
   Budget :
   <input type="range" name="budget" min="100" max="5000" value="1000" step="100" onchange="document.getElementById('display').innerHTML=this.value">
   <span id="display">1000</span>
    </form>
</html>
အဲဒီ code မှာ ကျွန်တော်တိုကတွေ range ရဲ့ onchange event မှာ script လေးရေးထားတာကို တွေ့ရပါလိမ့်မယ်။
onchange="document.getElementById('display').innerHTML=this.value"
value change သွားတိုင်း id ကို display လို့ပေးထားတဲ့ element က html ကို သွားပြင်ပေးပါလိမ့်မယ်။ ဒါကြောင့် range slider value ပြင်လိုက်တိုင်း လိုက်ပြီး update လုပ်ပေးနေပါလိမ့်မယ်။

Figure 8-20
Add a File Upload
File တွေကို တင်မယ် ၊ profile ပုံကိုတင်မယ် စတာတွေအတွက် form မှာ file upload ကို အသုံးပြုရပါတယ်။ File upload တင်မယ်ဆိုရင်တော့ method ဟာ post ကို သုံးရပါမယ်။ နောက်ပြီးတော့ enctype ကို multipart/form-data သုံးရပါမယ်။
| Type | Description |
|---|---|
| application/x-www-form-urlencoded | Default တန်ဖိုး ဖြစ်ပါတယ်။ စာလုံးတွေ အားလုံးကို encode လုပ်ပြီးတော့ backend server ဆီပို့ပါမယ်။ ဥပမာ space ဆိုရင် + symbols ပြောင်းပြီး ပို့ပါတယ်။ |
| multipart/form-data | File upload လုပ်တဲ့ အခါမှာ အသုံးပြုရန် အတွက်ပါ။ |
| text/plain | Space ကို "+" ပြောင်းပေးပါတယ်။ သို့ပေမယ့် special characters တွေကိုတော့ encoded မလုပ်ပါဘူး။ |
HTML file upload code လေးကြည့်ရအောင်။
<!DOCTYPE html>
<html>
<head>
    <meta charset="UTF-8">
    <title>Simple Form</title>
</head>
<body>
    <form method="post" action="./post.php" enctype="multipart/form-data">
   Photo :
   <input type="file" name="photo">
    </form>
</html>
အဲဒီ code လေးကို browser မှာ run လိုက်ရင် file upload control လေးနဲ့ မြင်ရပါလိမ့်မယ်။ Choose File ကို နှိပ်ပြီးတော့ file ကို ရွေးချယ်နိုင်ပါတယ်။

Figure 8-21. File upload
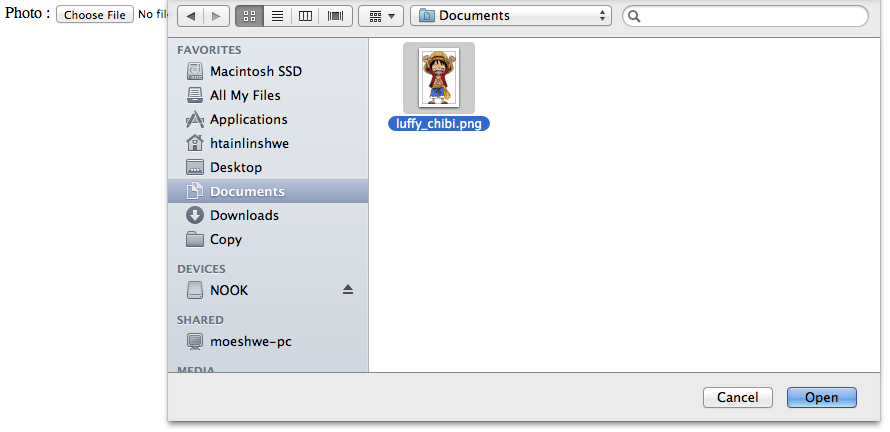
Figure 8-22. file ရွေးချယ်ရန်

Figure 8-22
တကယ်လို့ file အားလုံးကို လက်မခံလိုဘူးဆိုရင်တော့ MIME (Multipurpose Internet Mail Extensions) types ကို accept attribute ထဲမှာထည့်လို့ရပါတယ်။
<input type="file" name="photo" accept="image/gif, image/jpeg, image/png">
အထက်ပါ code မှာဆိုရင်တော့ gif, jpg , png စတဲ့ file တွေကိုပဲ လက်ခံပါလိမ့်မယ်။
Add a Submit Button
Data တွေကို server ဆီကို ပို့တော့မယ်ဆိုရင် submit button ကို နှိပ်ပြီး ပို့နိုင်ပါတယ်။ submit button ဟာ form submit event ကို သွားခေါ်ပေးပြီး form ထဲမှာရှိရင် data တွေကို name=value နဲ့ backend ဆီကို ပို့ပေးပါတယ်။ ပုံမှန် အားဖြင့် submit button ကို form ရဲ့ အောက်ဆုံး မှာ ထားတတ်ပါတယ်။ input type နေရာမှာ submit ကို အစားထိုး အသုံးပြုရုံပါပဲ။ value မထည့်ထားရင်တော့ default စာလုံး ဖြစ်တဲ့ Submit ဆိုပြီး ဖော်ပြပေးနေမှာပါ။
<!DOCTYPE html>
<html>
<head>
    <meta charset="UTF-8">
    <title>Simple Form</title>
</head>
<body>
    <form method="post" action="./post.php" enctype="multipart/form-data">
   Name : <input type="text" name="name">
   <br/>
   Birth Date : <input type="date" step="1">
      <br/>
   Budget :
   <input type="range" name="budget" min="100" max="5000" value="1000" step="100" onchange="document.getElementById('display').innerHTML=this.value">
   <span id="display">1000</span>
      <br/>
   <input type="submit" value="Send">
    </form>
</html>
အထက်ပါ code ဟာ browser မှာ ဆိုရင် အောက်က ပုံလို မြင်ရပါလိမ့်မယ်။ Submit button ဟာ Send ဆိုပြီး ဖော်ပြနေပါလိမ့်မယ်။

Figure 8-24
Add a Reset Button
Form မှာ data တွေ ထည့်သွင်းထားပြီးရင် ပြန်ပြီးတော့ clear လုပ်စေချင်ရင် reset button ကို ထည့်သွင်းနိုင်ပါတယ်။ reset button ကို နှိပ်လိုက်တာနဲ့ form မှာ ဖြည့်ထားတဲ့ data တွေ အားလုံးကို ရှင်းလိုက်မှာ ဖြစ်ပါတယ်။
<!DOCTYPE html>
<html>
<head>
    <meta charset="UTF-8">
    <title>Simple Form</title>
</head>
<body>
    <form method="post" action="./post.php" enctype="multipart/form-data">
   Name : <input type="text" name="name">
   <br/>
   Birth Date : <input type="date" step="1">
      <br/>
   Budget :
   <input type="range" name="budget" min="100" max="5000" value="1000" step="100" onchange="document.getElementById('display').innerHTML=this.value">
   <span id="display">1000</span>
      <br/>
   <input type="submit" value="Send">
   <input type="reset" value="Reset">
    </form>
</html>
ပြီးခဲ့တဲ့ submit code အောက်မှာ reset button ထပ်ဖြည့်ထားပါတယ်။
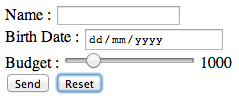
Figure 8-25
Require a Field
Form ကို submit လုပ်တဲ့ အခါမှာ အချို့ data တွေကို မဖြစ်မနေ ထည့်သွင်းစေချင်ပါတယ်။ အဲဒီ အခါမှာ require attribute ကို ထည့်သွင်းနိုင်ပါတယ်။
<!DOCTYPE html>
<html>
<head>
    <meta charset="UTF-8">
    <title>Simple Form</title>
</head>
<body>
    <form method="post" action="./post.php" enctype="multipart/form-data">
   Name : <input type="text" name="name" required>
   <br/>
   Birth Date : <input type="date" step="1" required>
      <br/>
   Budget :
   <input type="range" name="budget" min="100" max="5000" value="1000" step="100" onchange="document.getElementById('display').innerHTML=this.value">
   <span id="display">1000</span>
      <br/>
   <input type="submit" value="Send">
   <input type="reset" value="Reset">
    </form>
</html>
အဲဒီ code လေးဟာ browser မှာ ဆိုရင် အောက်ဖော်ပြပါ ပုံအတိုင်း မြင်ရပါလိမ့်မယ်။
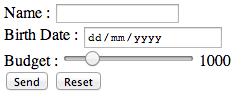
Figure 8-26
name နဲ့ birth date ကို required ထည့်သွင်းထားပါတယ်။
Name : <input type="text" name="name" required>
<br/>
Birth Date : <input type="date" step="1" required>
data တွေ မထည့်ပဲ submit လုပ်လိုက်တဲ့ အခါမှာ browser က error ပြပါလိမ့်မယ်။

Figure 8-27
Add a Placeholder
Text box မှာ data မထည့်သွင်းထားရင် စာ တစ်ခုခု ဖော်ပြထားစေချင်တယ်ဆိုရင် placeholder attribute ကို အသုံးပြုနိုင်ပါတယ်။
<!DOCTYPE html>
<html>
<head>
    <meta charset="UTF-8">
    <title>Simple Form</title>
</head>
<body>
    <form method="post" action="./post.php">
   Website :
   <input type="url" name="website" size="25" maxlength=255 placeholder="http://www.yoursite.com">
   <input type="submit">
    </form>
</html>
code ထဲမှာ placeholder ကို http://www.yoursite.com ဆိုပြီး ထည့်ထားပါတယ်။ စာရိုက်လိုက်တဲ့ အခါမှာ အဲဒီ placeholder မှာ ထည့်ထားတဲ့ စာသားပျောက်သွားတာကို တွေ့ရပါလိမ့်မယ်။

Figure 8-28
Validate Input with a Pattern
ကျွန်တော်တို့တွေ form မှာ data input ကို require သာ မဟုတ်ပဲ ထည့်တဲ့ data ကို ပြန်စစ်ချင်တယ်ဆိုရင် pattern attribute ကို အသုံးပြုနိုင်ပါတယ်။ ဥပမာ။။ 0-9 ပဲ ရိုက်ထည့်ခွင့်ပေးမယ်။ ဒါမှမဟုတ် A-z နဲ့ 0-9 ပဲ လက်ခံမယ်။ special character တွေ လက်မခံလိုဘူး။ ဒါတွေ အတွက် pattern ကို အသုံးပြုနိုင်ပါတယ်။ pattern ကို အသုံးပြုဖို့ regular expression ကိုတော့ နားလည် ထားဖို့လိုပါတယ်။
<!DOCTYPE html>
<html>
<head>
    <meta charset="UTF-8">
    <title>Simple Form</title>
</head>
<body>
    <form method="post" action="./post.php">
   Promotion code (only number and letters) :
   <input type="text" name="promocode" size="15" maxlength="15" pattern="[A-z0-9]*">
   <input type="submit">
    </form>
</html>
pattern ထဲမှာ [] က range ကိုဆိုလိုပါတယ်။ * ကတော့ zero or more ပါ။ pattern="[A-z0-9]*" ဆိုတဲ့ သဘောကတော့ A ကနေ z အထိ 0 ကနေ 9 အထိ လက်ခံတယ်။ ထည့်တဲ့ value က မရှိတာလည်း ဖြစ်နိုင်သလို တစ်ခု သို့မဟုတ် တစ်ခု ထက်မကလည်း ဖြစ်နိုင်တယ်။

Figure 8-29
ဒါကြောင့် special character ထည့်ပြီးတော့ submit လုပ်လိုက်တဲ့ အခါမှာ error ပြပါလိမ့်မယ်။

Figure 8-30
နောက်ထပ် ဥပမာ တစ်ခု ကြည့်ရအောင်။
<!DOCTYPE html>
<html>
<head>
    <title>Simple Form</title>
</head>
<body>
    <form method="post" action="./post.php">
   Phone Number (example: 95-911111111) :
   <input type="text" name="phone" size="12" maxlength="12" pattern="[0-9]{2}-[0-9]{9}">
   <input type="submit">
    </form>
</html>
အဲဒီ code မှာ phone number ကို ရှေ့ဆုံးမှာ နံပတ် ၂ ခု လာမယ်။ ပြီးရင် - လာမယ်။ နောက်ဆုံးမှာ နံပတ် ၉ ခု ထည့်ရမယ်။ စာလုံး အရေအတွက် {} ကိုအသုံးပြုပါတယ်။ [0-9]{2}-[0-9]{9} ဆိုတဲ့ သဘောကတော့ 0 ကနေ ၉ အတွင်း ဖြစ်ရမယ်။ {2} ဆိုတဲ့ အတွက်ကြောင့် စာလုံး ၂ လုံးဖြစ်ရမယ်။ ပြီးတော့ - လာတယ်။ ပြီးတဲ့ အခါမှာ 0 ကနေ 9 အထိ စာလုံး ၉ လုံး ဖြစ်တဲ့ အတွက်ကြောင့် [0-9]{9} ကို အသုံးပြုထားပါတယ်။