Adding and Modifying Text
ကျွန်တော်တို့ Chapter 1 မှာတုန်းကတော့ HTML အကြောင်း အနည်းငယ်မျှ သိပြီးပါပြီ။ အခု ကျွန်တော်တို့တွေ HTML မှာ စာတွေ ထည့်မယ်။ Bold , Italic စတာတွေကို ထည့်မယ်။ Paragraph တွေ ဖန်တီးတာတွေကို အခု chapter မှာ တွေ့နိုင်ပါလိမ့်မယ်။
Meta
HTML တစ်ခု ကို ဖန်တီးတဲ့ အတွက် ကျွန်တော်တို့တွေ Header ပိုင်းမှာ meta ကို လည်း အသုံးပြုကြပါတယ်။ Meta ဆိုတာကတော့ လက်ရှိ webpage ရဲ့ information တွေ ထည့်သွင်းဖော်ပြထားတာပါ။
<!DOCTYPE html>
    <html>
    <head>
        <title>This is title</title>
        <meta name="description" content="HTML5 book">
        <meta name="keywords" content="HTML,CSS,XML,JavaScript">
        <meta name="author" content="saturngod">
        <meta charset="UTF-8">
    </head>
    <body>
        Hello World!
    </body>
</html>
အထက်ပါ code ကို ကြည့်ရင် လက်ရှိ webpage ရဲ့ author က saturngod လို့ရေးထားတာတွေ့မှာပါ။ description ကတော့ search engine တွေက ကိုယ့် website ကို ဖော်ပြတဲ့အခါမှာ မြင်ရနိုင်တဲ့ text ပါ။ keywords meta ကိုတော့ အခုခေတ် search engine အများစုက ranking အတွက် မသုံးတော့ပါဘူး။ ဒါကြောင့် SEO အတွက် အရေးကြီးတာက စာသားအကြောင်းအရာကောင်းခြင်း၊ heading structure မှန်ခြင်း၊ page title နဲ့ description ကိုရှင်းလင်းအောင်ရေးခြင်းတွေ ဖြစ်ပါတယ်။
Create a New Paragraph
Paragraph တစ်ခု ကို တည်ဆောက်ဖို့ ရန်အတွက် ကျွန်တော်တို့ <p> tag ကို အသုံးပြုပါမယ်။ အောက်က ဥပမာ လေး ကို တချက်ကြည့်လိုက်ပါ။
<!DOCTYPE html>
<html>
    <head>
        <title>This is title</title>
        <meta name="description" content="HTML5 book">
        <meta name="keywords" content="HTML,CSS,XML,JavaScript">
        <meta name="author" content="saturngod">
        <meta charset="UTF-8">
    </head>
    <body>
        <p>HyperText Markup Language (HTML) is the main markup language for displaying web pages and other information that can be displayed in a web browser.</p>
        <p>The purpose of a web browser is to read HTML documents and compose them into visible or audible web pages. The browser does not display the HTML tags, but uses the tags to interpret the content of the page.</p>
    </body>
</html>
ကျွန်တော်တို့ တွေ စာတွေ ရေးသားရာမှာ အပိုဒ်တွေကို ခွဲပြီး ရေးသားလိုတဲ့ အခါမှာ <p> ကို အသုံးပြုကြပါတယ်။
အထက်ပါ code ကို browser မှာ ဖွင့်ကြည့်လိုက်ရင် အောက်ကလို မြင်ရပါလိမ့်မယ်။
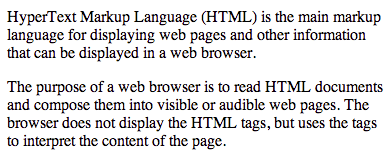
Figure 2-1. Paragraph
Add a Line Break
Paragraph မှာ စာတွေကို တစ်ကြောင်း တည်း မရေးလိုပဲ လိုင်းတွေ ခြားခြင် ရင်တော့ Line break tag <br/> ကို အသုံးပြုနိုင်ပါတယ်။
<!DOCTYPE html>
<html>
    <head>
        <title>This is title</title>
        <meta name="description" content="HTML5 book">
        <meta name="keywords" content="HTML,CSS,XML,JavaScript">
        <meta name="author" content="saturngod">
        <meta charset="UTF-8">
    </head>
    <body>
        <p>HyperText Markup Language (HTML) is the main markup language for displaying web pages <br/> and other information that can be displayed in a web browser.</p>

    </body>

</html>
ဆိုတဲ့ code မှာ <br/> ထည့်ထားတာ တွေ့မှာပါ။

Figure 2-2. Line Breaking
ပုံမှာ ပြထားတဲ့ အတိုင်း web pages နဲ့ and မှာ စာ တစ်ကြောင်း ဆင်းထားတာကို တွေ့ရမှာပါ။
Add a Line Break Opportunity
ကျွန်တော် တို့ အနေနဲ့ နောက်ထပ် line break အမျိုးအစား နောက်တစ်ခု <wbr/> ဆိုတာ ရှိပါသေးတယ်။ သူက <br/> နဲ့ မတူတာကတော့ line break လိုအပ်တဲ့ အချိန်မှသာ line break လုပ်သွားပေးတာပါ။ မလိုတဲ့ အချိန်မှာတော့ စာလုံးကို ဆက်ပြီး ဖော်ပြပေးပါတယ်။
<!DOCTYPE html>
<html>
    <head>
        <title>This is title</title>
        <meta name="description" content="HTML5 book">
        <meta name="keywords" content="HTML,CSS,XML,JavaScript">
        <meta name="author" content="saturngod">
        <meta charset="UTF-8">
    </head>
    <body>
        <p>HyperText Markup Language (HTML) is the main markup language for displaying web pages and other information that can be displayed in a web browser. Yayyyyy<wbr/>!!!!!!!!!!!!!!!!!!!!!!!!!!!</p>

    </body>

</html>
code ထဲမှာ <wbr/> ကို Yayyyyy နဲ့ !!!!!!!!!!!!!!!!!!!!!!!!!!! ကြားမှာ ထည့်ထားပေးပါတယ်။

Figure 2-3 : စာကြောင်းဆန့် ၍ Line Break မလုပ်ခြင်း
screen မှာ ဖော်ပြလို့ ရရင်တော့ Line break မလုပ်ပဲ screen သေးသွားပြီး မဆန့်တော့ရင်တော့ အလိုလို line break လုပ်ပေးပါတယ်။

Figure 2-4 : စာကြောင်းမဆန့် ၍ Line Break လုပ်ခြင်း
Add a Horizontal Rule
HTML မှာ မျဉ်းကို အလျားလိုက်တားပြီးတော့ တစ်ခု နဲ့ တစ်ခုကို ပိုင်းဖြတ်လိုရင်တော့ ကျွန်တော်တို့ <hr/> ကို အသုံးပြုနိုင်ပါတယ်။
<!DOCTYPE html>
<html>
    <head>
        <title>This is title</title>
        <meta name="description" content="HTML5 book">
        <meta name="keywords" content="HTML,CSS,XML,JavaScript">
        <meta name="author" content="saturngod">
        <meta charset="UTF-8">
    </head>
    <body>
        <p>HyperText Markup Language (HTML) is the main markup language for displaying web pages and other information that can be displayed in a web browser.</p>
        <hr/>
        <p>The purpose of a web browser is to read HTML documents and compose them into visible or audible web pages. The browser does not display the HTML tags, but uses the tags to interpret the content of the page.</p>
    </body>

</html>
ဆိုတဲ့ Code မှာ <hr/> လို့ ရေးထားတာကို တွေ့နိုင်ပါတယ်။ အဲဒီ code လေးကို browser မှာ ဆိုရင် အောက်ကလို မြင်ရပါမယ်။
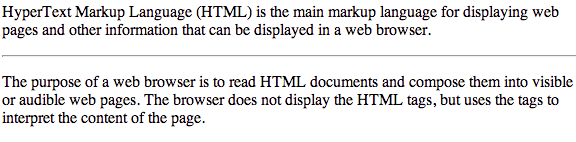
Figure 2-5. Line Break
အထက်ပါ ပုံထဲမှာ စာ ပိုဒ် ၂ ခု ကြားမှာ မျဉ်းကြောင်းလေး ကို တွေ့ရပါလိမ့်မည်။
Insert a Blank Space
HTML မှာ ပုံမှန် အတိုင်း space တွေ ရိုက်သွားပေမယ့် space တစ်နေရာစာပဲ ပေါ်ပါတယ်။ ကျွန်တော်တို့တွေ space တွေ ကို ထည့်ဖြည့်ချင်ရင်တော့ Special Character ကို အသုံးပြုရပါတယ်။ Space အတွက် ကျွန်တော်တို့ special character ဆိုတာလေးကို သုံးပါမယ်။
<!DOCTYPE html>
<html>
<head>
<title>This is title</title>
<meta name="description" content="HTML5 book">
<meta name="keywords" content="HTML,CSS,XML,JavaScript">
<meta name="author" content="saturngod">
<meta charset="UTF-8">
</head>
<body>
<p> HyperText Markup Language (HTML) is the main markup language for displaying web pages and other information that can be displayed in a web browser.</p>
<p>The purpose of a web browser is to read HTML documents and compose them into visible or audible web pages. The browser does not display the HTML tags, but uses the tags to interpret the content of the page.</p>
</body>
</html>
ကျွန်တော်တို့ ပထမ စာပိုဒ်မှာ space ၃ နေရာ ခြားထားတာကို တွေ့နိုင်ပါတယ်။
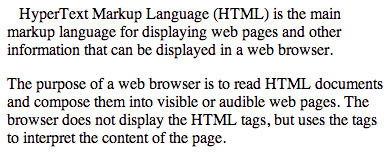
Figure 2-6. Space
Make Text Bold
စာလုံးတွေကို အရေးကြီးကြောင်း ဖော်ပြချင်ရင်တော့ <strong> နဲ့ </strong> ကြားမှာ ထည့်ရေးရပါတယ်။ အဓိပ္ပါယ်မပြောင်းဘဲ visual အနေနဲ့သာ bold ဖြစ်ချင်ရင် CSS ကို အသုံးပြုတာ ပိုကောင်းပါတယ်။ <b> tag ကလည်း modern HTML မှာ valid ဖြစ်နေသေးပေမယ့် အရေးကြီးမှုကို ဖော်ပြချင်ရင် <strong> ကို သုံးပါ။
<!DOCTYPE html>
<html>
    <head>
        <title>This is title</title>
        <meta name="description" content="HTML5 book">
        <meta name="keywords" content="HTML,CSS,XML,JavaScript">
        <meta name="author" content="saturngod">
        <meta charset="UTF-8">
    </head>
    <body>
        <p>HyperText Markup Language <strong>(HTML)</strong> is the main markup language for displaying web pages and other information that can be displayed in a web browser.</p>

    </body>

</html>
အထက်ပါ code မှာ (HTML) ကို ကျွန်တော်တို့ bold လုပ်ထားတာ တွေ့နိုင်ပါတယ်။
အဲဒီ code လေးကို ကြည့်လိုက်ရင် အောက်ကလို မြင်ရပါလိမ့်မယ်။

Figure 2-7. (HTML) ကို bold ဖြစ်နေသည်။
Make Italic Text
စာလုံးတွေကို emphasize လုပ်ချင်တဲ့ အခါမှာတော့ <em> နဲ့ </em> ကြားမှာ ထည့်ရေးရပါတယ်။ အဓိပ္ပါယ်မပြောင်းဘဲ visual အနေနဲ့သာ italic ဖြစ်ချင်ရင် CSS ကို အသုံးပြုတာ ပိုကောင်းပါတယ်။ <i> tag ကလည်း modern HTML မှာ valid ဖြစ်နေသေးပေမယ့် emphasis အတွက်တော့ <em> ကို သုံးပါ။
<!DOCTYPE html>
<html>
    <head>
        <title>This is title</title>
        <meta name="description" content="HTML5 book">
        <meta name="keywords" content="HTML,CSS,XML,JavaScript">
        <meta name="author" content="saturngod">
        <meta charset="UTF-8">
    </head>
    <body>
        <p>HyperText Markup Language <em>(HTML)</em> is the main markup language for displaying web pages and other information that can be displayed in a web browser.</p>

    </body>

</html>
အထက်ပါ code ကို browser မှာ ကြည့်လျှင် အောက်ပါ အတိုင်း မြင်ရပါလိမ့်မယ်။

Figure 2-8: (HTML) ကို italic ဖြစ်နေသည်။
Preformatted Text
line brekas တွေ space တွေ အားလုံးကို ရိုက်ထည့်လိုက်သလို အလုပ်လုပ်စေချင်ရင်တော့ performatted text ကို အသုံးပြုနိုင်ပါတယ်။ <pre> နဲ့ </pre> ကြားထဲမှာ ရေးထားလိုက်ရင် ရပါတယ်။ ပုံမှန် အားဖြင့် web browser က line break တွေ space တွေ အားလုံးကို ပြသတဲ့ အခါမှာ အသုံးမပြုပါဘူး။ ကျွန်တော် တို့ အပေါ်မှာ ရေးခဲ့တဲ့ ဥပမာလို space တွေ အတွက် သီးသန့် special code ကို အသုံးပြုခဲ့ရပါတယ်။ HTML code မှာ လိုင်း ခြားထားပေမယ့် <br/> အသုံးမပြုထားရင်တော့ browser မှာ လိုင်း မခြားပါဘူး။ အောက်က code လေးကို တချက်လောက် လေ့လာကြည့်ရအောင်။
<!DOCTYPE html>
<html>
    <head>
        <title>This is title</title>
        <meta name="description" content="HTML5 book">
        <meta name="keywords" content="HTML,CSS,XML,JavaScript">
        <meta name="author" content="saturngod">
        <meta charset="UTF-8">
    </head>
    <body>
        <pre>
Name:		Saturngod
Book:		HTML5
Year:		2013
        </pre>
        <pre>
        Name:		Saturngod
        Book:		HTML5
        Year:		2013
        </pre>

    </body>

</html>
အဲဒီ code လေးကိုတော့ အောက်ကလို မြင်ရပါလိမ့်မယ်။
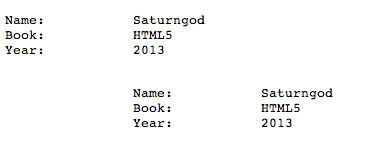
Figure 2-9.
ကျွန်တော် Tab တွေနဲ့ ခြားထားတဲ့အတွက်ကြောင့် browser မှာ ပေါ်တဲ့ အခါလည်း ကျွန်တော် ရေးထားတဲ့ အတိုင်းပေါ်ပါတယ်။ အထက်ပါ code မှာ <pre> နဲ့ </pre> ကြားက text တွေမှာ စစခြင်း space မခြားထားတာကို တွေ့နိုင်ပါတယ်။ ဒုတိယ code မှာတော့ space တွေ ထည့်ထားပါတယ်။ ဒါကြောင့် ပြတဲ့ အခါမှာလည်း space တွေ ခြားပြီး ထွက်လာပါတယ်။
Add Heading
Page တစ်ခု ရေးသားတဲ့ အခါမှာ ကျွန်တော်တို့တွေ ခေါင်းစဉ် တွေ ထည့်ရတာတွေ ရှိပါတယ်။ ဥပမာ အခု စာအုပ်မှာဆိုရင် ကျွန်တော်တို့တွေ <h1>Chapter 2: Adding and Modifying Text</h1> ဆိုပြီး Chapter တွေရဲ့ heading ကို အသုံးပြုထားပါတယ်။ Heading level 6 ခု အထိ ရှိပါတယ်။ h1,h2,h3 ကနေ h6 ထိပေါ့။
<!DOCTYPE html>
<html>
<head>
    <title>This is title</title>
    <meta name="description" content="HTML5 book">
    <meta name="keywords" content="HTML,CSS,XML,JavaScript">
    <meta name="author" content="saturngod">
    <meta charset="UTF-8">
</head>
<body>
<h1>Chapter 1</h1>
<h2>sub header 1.1</h2>
<h3>header h3</h3>
<h4>header h4</h4>
<h5>header h5</h5>
<h6>header h6</h6>
</body>
</html>
ဆိုတဲ့ code လေးကို run လိုက်ရင် အောက်လို မျိုး မြင်ရပါလိမ့်မယ်။
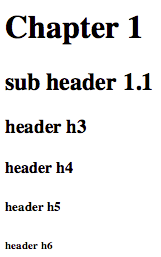
Figure 2-10 : Header Level
H1 က အကြီးဆုံးဖြစ်နေပြီး တဖြည်းဖြည်း သေးသွားတာကို တွေ့နိုင်ပါတယ်။ h1 ကိုတော့ main header အဖြစ် အသုံးပြုပြီးတော့ level အလိုက် header တွေ ကို ခွဲထားတာပါ။
Add Block Quote
ကျွန်တော်တို့တွေ စာတွေနဲ့ အခြား quote တွေကို သီးခြားခွဲပြ ချင်တဲ့ အခါမှာတော့ block quotes ကို အသုံးပြုပါတယ်။ <blockquote> ကို အသုံးပြုတဲ့ အခါမှာ စာတွေက ဘယ်ဘက်ကနေ အနည်းငယ်ခွာ ပြီး ပြပေးပါလိမ့်မယ်။
<!Doctype html>
<html>
<head>
    <title>Quote</title>
</head>
<body>
<h1>Quotes</h1>
<blockquote>Live as if you were to die tomorrow. Learn as if you were to live forever.</blockquote>
Mahatma Gandhi

<blockquote>The more that you read, the more things you will know. The more that you learn, the more places you'll go.</blockquote>
Dr. Seuss, I Can Read With My Eyes Shut!

<blockquote>The love of learning, the sequestered nooks, And all the sweet serenity of books</blockquote>
Henry Wadsworth Longfellow

</body>
</html>
ဆိုတဲ့ code လေးကို browser မှာ ကြည့်လိုက်ရင် အောက်ကလို မြင်ရပါလိမ့်မယ်။
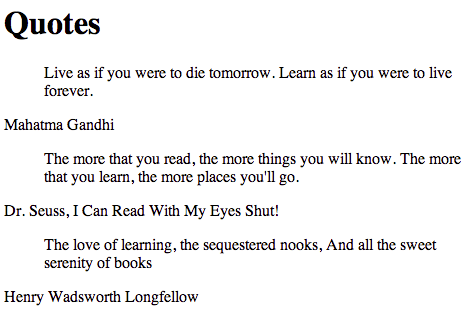
Figure 2-11
<blockquote> သုံးထားတဲ့ စာတွေဟာ ဘယ်ဘက်ကနေ ကွာနေပြီးတော့ သီးသန့် ဖြစ်နေတာကို တွေ့နိုင်ပါတယ်။
Add Small Text
ကျွန်တော်တို့တွေ စာကြောင်း အသေးလေးတွေကို အသုံးပြုချင်တဲ့ အခါမှာတော့ <small> ကို အသုံးပြုရပါတယ်။ အထူးသဖြင့် ကျွန်တော်တို့တွေ copyright လိုမျိုး စာသားတွေ မှာ အသုံးများပါတယ်။
<!DOCTYPE html>
<html>
<head>
<title>Small</title>
<meta name="description" content="HTML5 book">
<meta name="keywords" content="HTML,CSS,XML,JavaScript">
<meta name="author" content="saturngod">
<meta charset="UTF-8">
</head>
<body>
<h1>HTML</h1>
<p>HyperText Markup Language (HTML) is the main markup language for creating web pages and other information that can be displayed in a web browser.</p>
<p>HTML is written in the form of HTML elements consisting of tags enclosed in angle brackets (like <html>), within the web page content. HTML tags most commonly come in pairs like <h1> and </h1>, although some tags, known as empty elements, are unpaired, for example <img>. The first tag in a pair is the start tag, the second tag is the end tag (they are also called opening tags and closing tags). In between these tags web designers can add text, tags, comments and other types of text-based content.</p>
<small>Copyright 2012 Wikipedia</small>
</body>
</html>
အထက်ပါ code ကို browser မှာ ကြည့်လိုက်ရင် အောက်ကလို မြင်ရပါမယ်။ small tag နဲ့ ရေးထားတဲ့ စာလေးတွေက သေးနေတာကို တွေ့နိုင်ပါတယ်။
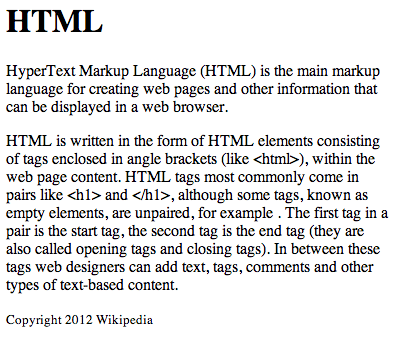
Figure 2-12
Comment
ကျွန်တော်တို့တွေ HTML မှာ မှတ်ချက်တွေကို ထည့်သွင်းလို့ရပါတယ်။ comment ဆိုတာကတော့ web browser မှာ ဖော်မပြထားပဲ code ကိုပဲ ရည်ညွှန်းထားတာကို ဆိုလိုတာပါ။ အောက်က code ကို ကြည့်လိုက်ပါ။
<!DOCTYPE html>
<html>
<head>
<title>Small</title>
<meta name="description" content="HTML5 book">
<meta name="keywords" content="HTML,CSS,XML,JavaScript">
<meta name="author" content="saturngod">
<meta charset="UTF-8">
</head>
<body>
<h1>HTML</h1>
<p>HyperText Markup Language (HTML) is the main markup language for creating web pages and other information that can be displayed in a web browser.</p>
<!-- Another Paragraph Start -->
<p>HTML is written in the form of HTML elements consisting of tags enclosed in angle brackets (like <html>), within the web page content. HTML tags most commonly come in pairs like <h1> and </h1>, although some tags, known as empty elements, are unpaired, for example <img>. The first tag in a pair is the start tag, the second tag is the end tag (they are also called opening tags and closing tags). In between these tags web designers can add text, tags, comments and other types of text-based content.</p>
<!-- Small Tag for coyright -->
<small>Copyright 2012 Wikipedia</small>
</body>
</html>
အထက်ပါ code ကို ကြည့်လိုက်ရင် comment ၂ ခု ထည့်ထားတာကိုတွေ့နိုင်ပါတယ်။ comment က <!-- နဲ့ စပြီးတော့ --> နဲ့ ဆုံးပါတယ်။ အဲဒီကြားထဲမှာ ရေးရပါတယ်။ အဲဒီ code ကို run ကြည့်ရင် အပေါ်က small text example အတိုင်းပဲ မြင်ရမှာပါ။ ဒါကြောင့် ကျွန်တော် example ပုံမပြတော့ပါဘူး။ ကိုယ်တိုင် စမ်းကြည့်လိုက်ပါ။
Create a Numbered List
Number list ဆိုတာကတော့ 1,2,3,4 စတဲ့ list တွေပေါ့။ ကျွန်တော်တို့တွေ number list ကို ဖန်တီးချင်ရင်တော့ <ul> နဲ့ <li> ကို အသုံးပြု့ရပါတယ်။ <li> ကတော့ မိမိ ထည့်ချင်တဲ့ list ပေါ့။ အောက်က code လေးကို ကြည့်လိုက်ရင် ရှင်းသွားမှာပါ။
<!DOCTYPE html>
<html>
<head>
    <title>Small</title>
    <meta name="description" content="HTML5 book">
    <meta name="keywords" content="HTML,CSS,XML,JavaScript">
    <meta name="author" content="saturngod">
    <meta charset="UTF-8">
</head>
<body>
<h1>Order List</h1>
<ol type="A">
    <li>List 1 </li>
    <li>List 2 </li>
    <li>List 3 </li>
    <li>List 4 </li>
    <li>List 5 </li>
</ol>

<ol type="a">
    <li>List 1 </li>
    <li>List 2 </li>
    <li>List 3 </li>
    <li>List 4 </li>
    <li>List 5 </li>
</ol>

<ol type="I">
    <li>List 1 </li>
    <li>List 2 </li>
    <li>List 3 </li>
    <li>List 4 </li>
    <li>List 5 </li>
</ol>

<ol type="i">
    <li>List 1 </li>
    <li>List 2 </li>
    <li>List 3 </li>
    <li>List 4 </li>
    <li>List 5 </li>
</ol>

<ol type="1">
    <li>List 1 </li>
    <li>List 2 </li>
    <li>List 3 </li>
    <li>List 4 </li>
    <li>List 5 </li>
</ol>

<ol type="i" start="4">
    <li>List 4 </li>
    <li>List 5 </li>
    <li>List 6 </li>
    <li>List 7 </li>
    <li>List 8 </li>
</ol>
</body>
</html>
type ဆိုတာကတော့ အမျိုးအစားပါ။ type ကို မထည့်ထားခဲ့ရင် default အနေနဲ့ 1 ဖြစ်နေမှာပါ။ စချင်တဲ့ နေရာကို start နဲ့ အသုံးပြုပါတယ်။ <ol type="i" start="4"> လို့ရေးထားတဲ့အတွက် 4 ကနေ စနေတာ တွေ့နိုင်ပါတယ်။
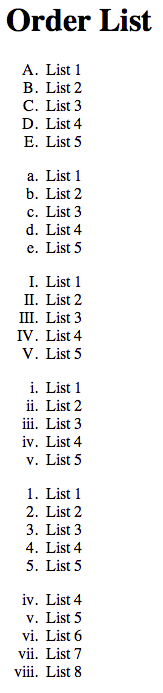
Figure 2-13
Create a Bulleted List
<!DOCTYPE html>
<html>
<head>
    <title>Small</title>
    <meta name="description" content="HTML5 book">
    <meta name="keywords" content="HTML,CSS,XML,JavaScript">
    <meta name="author" content="saturngod">
    <meta charset="UTF-8">
</head>
<body>
<h1>Bulleted List</h1>
<ul style="list-style-type: square">
    <li>List 1 </li>
    <li>List 2 </li>
    <li>List 3 </li>
    <li>List 4 </li>
    <li>List 5 </li>
</ul>

<ul style="list-style-type: disc">
    <li>List 1 </li>
    <li>List 2 </li>
    <li>List 3 </li>
    <li>List 4 </li>
    <li>List 5 </li>
</ul>

<ul style="list-style-type: circle">
    <li>List 1 </li>
    <li>List 2 </li>
    <li>List 3 </li>
    <li>List 4 </li>
    <li>List 5 </li>
</ul>
</body>
</html>
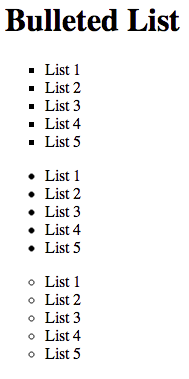
Figure 2-14
အထက်က code မှာ <ul> ကိုပဲ အသုံးပြုထားတာ တွေ့မှာပါ။ HTML5 မှာ type attribute ကို <ul> အတွက် အသုံးမပြုတော့ပါဘူး။ Bullet ပုံစံ ပြောင်းချင်ရင် CSS ရဲ့ list-style-type ကို အသုံးပြုရပါမယ်။
<ul style="list-style-type:square">
    <li>List 1</li>
</ul>
Create Nested List
Order List ပဲ ဖြစ်ဖြစ် Bulleted List ပဲ ဖြစ်ဖြစ် ကျွန်တော်တို့တွေ အဆင့်ဆင့် ရေးလို့ရပါတယ်။
<!DOCTYPE html>
<html>
<head>
    <title>Small</title>
    <meta name="description" content="HTML5 book">
    <meta name="keywords" content="HTML,CSS,XML,JavaScript">
    <meta name="author" content="saturngod">
    <meta charset="UTF-8">
</head>
<body>
<h1>Order List</h1>
<ol>
    <li>List 1</li>
    <li>List 2
        <ol>
            <li>List 1 </li>
            <li>List 2 </li>
            <li>List 3 </li>
            <li>List 4 </li>
            <li>List 5 </li>
        </ol>
    </li>
    <li>List 3 </li>
    <li>List 4 </li>
    <li>List 5 </li>
</ol>

<ul>
    <li>List 1</li>
    <li>List 2
        <ul>
            <li>List 1 </li>
            <li>List 2 </li>
            <li>List 3 </li>
            <li>List 4 </li>
            <li>List 5 </li>
        </ul>
    </li>
    <li>List 3 </li>
    <li>List 4 </li>
    <li>List 5 </li>
</ul>

</body>
</html>
မှာဆိုရင် ကျွန်တော်တို့တွေ <li> ထဲမှာ ထပ်ပြီးတော့ <ul> နဲ့ ရေးထားတာကို တွေ့နိုင်ပါတယ်။
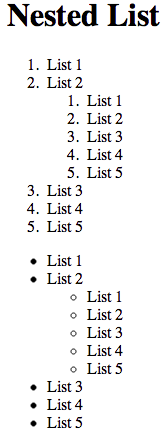
Figure 2-15
Create Definition List
အဓိပ္ပာယ် ဖော်ပြတဲ့ စကားလုံးတွေ ဥပမာ။။ အဘိဓာန် လိုမျိုး စာလုံး နဲက အဓိပ္ပာယ် ဖော်ပြတဲ့ ကိစ္စတွေမှာ Definition List ကို အသုံးများပါတယ်။
<!DOCTYPE html>
<html>
<head>
    <title>Small</title>
    <meta name="description" content="HTML5 book">
    <meta name="keywords" content="HTML,CSS,XML,JavaScript">
    <meta name="author" content="saturngod">
    <meta charset="UTF-8">
</head>
<body>
<h1>What's in a Bag ?</h1>
<dl>
    <dt>Backpack</dt>
        <dd>A bag for carrying hiking supplies and lunch</dd>
    <dt>Fanny pack</dt>
        <dd>A bag for carrying a passport wallet, and camera</dd>
    <dt>Suitcase</dt>
        <dd>A bag for carrying clothes and toilets</dd>
    <dt>Briefcase</dt>
        <dd>A bag for carrying business documents, files and pens</dd>
</dl>
</body>
</html>
ဆိုတဲ့ code လေးကို အောက်ကလို ပေါ်ပါမယ်။
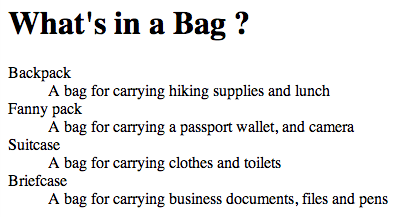
Figure 2-16
<dl> နဲ့ စပြီးတော့ </dl> နဲ့ ဆုံးပါတယ်။ <dt> ကတော့ defination title ပေါ့။ <dd> ကတော့ defination အနေနဲ့ သုံးပါတယ်။
Abbreviation
အတိုချုံး စကားလုံးတွေကို အသုံးပြုချင်တဲ့ အခါမှာတော့ <abbr> tag ကို အသုံးပြုပါတယ်။
<!DOCTYPE html>
<html>
<head>
    <title>Small</title>
    <meta name="description" content="HTML5 book">
    <meta name="keywords" content="HTML,CSS,XML,JavaScript">
    <meta name="author" content="saturngod">
    <meta charset="UTF-8">
</head>
<body>
<h1>Medical Alert</h1>
<p>Ascending to high elevations can cause altitude sickness, including <abbr title="high altitude pulmonary edema">HAPE</abbr>.</p>
</body>
</html>
အပေါ်က code မှာ title= ဆိုတာကို တွေ့မှာပါ။ title ဆိုတာကတော့ mouse pointer စာပေါ်တင်လိုက်ရင် တွေ့ရမယ့် tooltip စာပါ။ အဲဒီ code လေးကို အောက်ကလို မြင်ရမှာပါ။

Figure 2-17
Insert Date and Time
အချိန်နဲ့ နေ့စွဲတွေကို ဖော်ပြချင်တဲ့ အခါမှာတော့ <time> ကို ကျွန်တော် တို့တွေ အသုံးပြုပါတယ်။ အောက်က code လေးကို တချက်ကြည့်လိုက်ပါ။
<!DOCTYPE html>
<html>
<head>
    <title>Small</title>
    <meta name="description" content="HTML5 book">
    <meta name="keywords" content="HTML,CSS,XML,JavaScript">
    <meta name="author" content="saturngod">
    <meta charset="UTF-8">
</head>
<body>
<h1>Snorkel Cruise Information</h1>
<p>The boat will leave the harbor at <time>8:30 a.m. on Sunday morning</time>.</p>
</body>
</html>
browser မှာတော့ ပုံမှန် စာပဲ ဖော်ပြနေမှာပါ။ <time> ကို သုံးထားတဲ့အတွက် ထူးထူးခြားခြား ပြောင်းလဲ သွားတဲ့ ပုံစံ မရှိပါဘူး။ အဲဒီ code လေးကို အခုလို ပြောင်းလဲပါမယ်။
<!DOCTYPE html>
<html>
<head>
    <title>Small</title>
    <meta name="description" content="HTML5 book">
    <meta name="keywords" content="HTML,CSS,XML,JavaScript">
    <meta name="author" content="saturngod">
    <meta charset="UTF-8">
</head>
<body>
<h1>Snorkel Cruise Information</h1>
<p>The boat will leave the harbor at <time datetime="2011-08-21T08:30:00">8:30 a.m. on Sunday morning</time>.</p>
</body>
</html>
အထက်ပါ code မှာ datetime="2011-08-21T08:30:00" ဆိုတာကတော့ YYYY-MM-DD format နဲ့ရေးထားပြီး T ရဲ့ အနောက်မှာတော့ HH:MM:SS ကို ထည့်သွင်းထားတာပါ။ browser မှာတော့ ဘာမှ မထူးပါဘူး။ ဒါပေမယ့် ကျွန်တော်တို့ javascript နဲ့ တွဲသုံးလို့ရပါတယ်။
datetime attribute ကို အမြဲသုံးဖို့လိုလားဆိုတော့ မလိုပါဘူး။ မထည့်သွင်းလည်း ရပါတယ်။
Insert Special Character
Special character တွေကို အသုံးပြုချင်တဲ့ အခါ သီးသန့် code တွေ နဲ့ ကျွန်တော်တို့တွေ အသုံးပြုရပါတယ်။
<!DOCTYPE html>
<html>
<head>
<title>Small</title>
<meta name="description" content="HTML5 book">
<meta name="keywords" content="HTML,CSS,XML,JavaScript">
<meta name="author" content="saturngod">
<meta charset="UTF-8">
</head>
<body>
<h1>M and B Adventure Travel ®</h1>
<p>For more than 10 years, M and B adventure travel has helped customers fulfill their dreams and conquer their fears.
We specialize in one-of-a-kind vaction package to the most destination in the world. Let us help you with your hotel bookings, helicopter tour , and shark-cage rentals, eithor online or in person.</p>
</body>
</html>
ဆိုတဲ့ code မှာ ® ကို ® အနေနဲ့ မြင်ရမှာပါ။
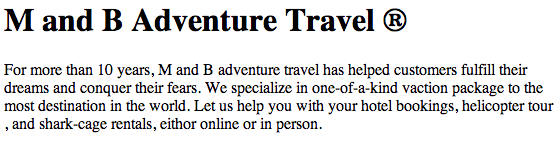
Figure 2-18
Special characters တွေ ကို အောက်က ဇယားမှာ ကြည့်နိုင်ပါတယ်။
| Description | Special Character | Code |
|---|---|---|
| Copyright | © | © |
| Registered trademark | ® | ® |
| Trademark | TM | ™ |
| paragraph mark | ¶ | ¶ |
| nonbreaking space | | |
| quotation mark | “ | " |
| left angle quote | « | « |
| right angle quote | » | » |
| ampersand | & | & |
| inverted exclamation | ¡ | ¡ |
| inverted question mark | ¿ | ¿ |
| broken vertical bar | ¦ | ¦ |
| section | § | § |
| not | ¬ | ¬ |
| acute accent | ´ | ´ |
| cedilla | ¸ | ¸ |
| bullet | • | • |
| capital N, tilde | Ñ | &NTilde; |
| small n, tilde | ñ | ñ |
| capital A, tilde | Ã | Ã |
| small a, tilde | ã | ã |
| capital A, grave accent | À | À |
| small a, grave accent | à | à |
| capital O, slash | Ø | Ø |
| small o, slash | ø | ø |
| em dash | — | — |
| en dash | – | – |
| micro | µ | µ |
| macron | ¯ | ¯ |
| superscript one | 1 | ¹ |
| superscript two | 2 | ² |
| superscript three | 3 | ³ |
| one-half fraction | 1⁄2 | ½ |
| one-fourth fraction | 1⁄4 | ¼ |
| three-fourths fraction | 3⁄4 | ¾ |
| degree | ° | ° |
| multiply | × | × |
| division | ÷ | ÷ |
| plus-or-minus | ± | ± |
| less-than | < | < |
| greater-than | > | > |
| dagger | † | † |
| double dagger | ‡ | ‡ |
| cent | ¢ | ¢ |
| pound sterling | £ | £ |
| euro | € | € |
| yen | ¥ | ¥ |
| general currency | ¤ | ¤ |